Stones Illuminated combines the Sailor’s skipping stones and lily pads with the Explorer’s coloured beams. Plain stones stop a beam; crystal stones transmit it and can acquire its power. Before pushing a stone, decide whether it must block the light, become a stepping tile or continue through a wall.
This guide covers the southwest approach and selected first-visit layouts: the moving green emitter, green-lit crystal platforms, purple-beam body blocking, paired orange beams and a waterborne robot. Match each layout before using its route. Later ground-layer rooms are outside this walkthrough, and puzzle numbers from different videos do not identify the same room reliably.
Reach the southwest golden path
From the central hub, take the southwest approach. Push the first stone left to open the way, ride the golden lily pad upward, then use the green beam already activated in the West to pass through the wall onto the golden path. The SxB gold room is on that route; the crossover combines progress from the South and the beam world.
The routes below follow the first-visit rooms in 塞德莎’s recorded walkthrough, as described in the collected room guide. Some solution videos count the gold room as their first puzzle; others begin with the green-beam rooms. Use the screenshots and room descriptions here instead of adding or subtracting an assumed puzzle number.
Choose the stone for the job
| Object or effect | What changes your next move |
|---|---|
| Plain skipping stone | Blocks the beam and can determine a purple beam’s endpoint. |
| Crystal skipping stone | Lets light pass; in green light it can phase into walls. |
| Purple beam | Carries you to its far endpoint. Check that the landing tile has floor immediately above or below so you can step out. |
| Moving emitter | Can ride a lily pad. Its useful beam position moves with it. |
| Character | Can stop an incoming skipping stone by standing on its far side. |
| Patrolling robot | Continues moving in water and can carry or push objects. |
A stone that is useful as a beam blocker is not interchangeable with a crystal. A crystal that keeps a green beam alive can be the wrong choice for a tile where a stone needs to stop against a wall.
Follow the green emitter across the walled walkways
Identify the room with a vertical green beam on the right, a narrow lower platform containing the goal, and a separate walled platform at the upper left. The emitter must travel on a lily pad while you follow its light through walls.
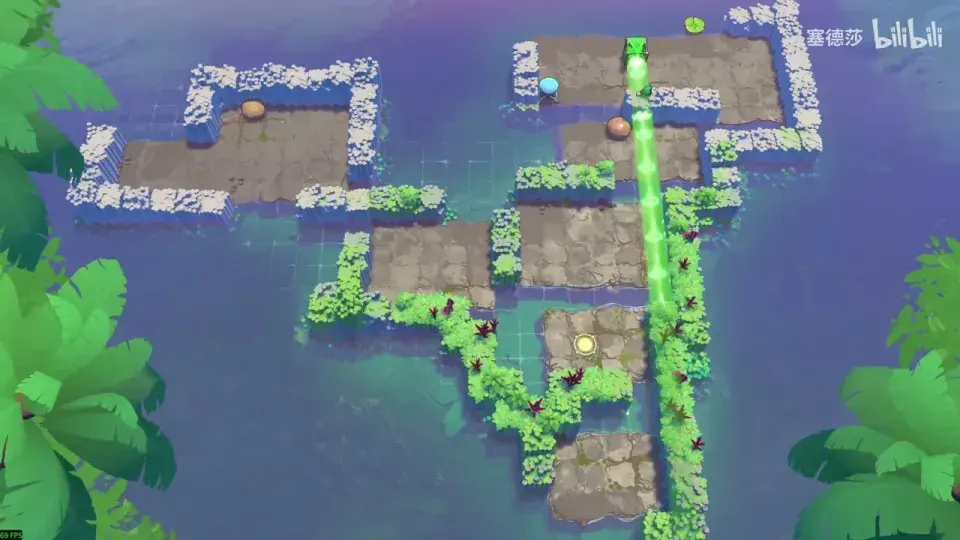
Follow the returning green light through the walls. Gameplay frame from 塞德莎’s recorded walkthrough.
- While the green beam covers the route, go down through the wall and push the bottom stone upward to clear it.
- Put the green emitter onto the lily pad and start the pad moving. Stay with the beam: it provides the ability to cross the walls on this route.
- Move left and pass through the wall to the upper-left platform. Bring its stone out while the beam still reaches you, then run left and push the stone upward to send the pad back the other way.
- Follow the returning beam toward the bottom right. Cross the wall and wait below.
- For the last approach, wait for the beam to arrive, pass through the wall and move up quickly to the goal.
The starting gem blocks the light on the final stretch, so walking straight upward early does not work. The route depends on the returning emitter covering the wall as you cross it. The recorded room starts at 3:43, with the final approach at 4:56.
Fill the gaps without losing the crystal inside a wall
The next matching layout has three green emitters along the left edge, several broken platform connections and both plain and crystal stones. Its lesson is the difference between transmitting the beam and stopping it.
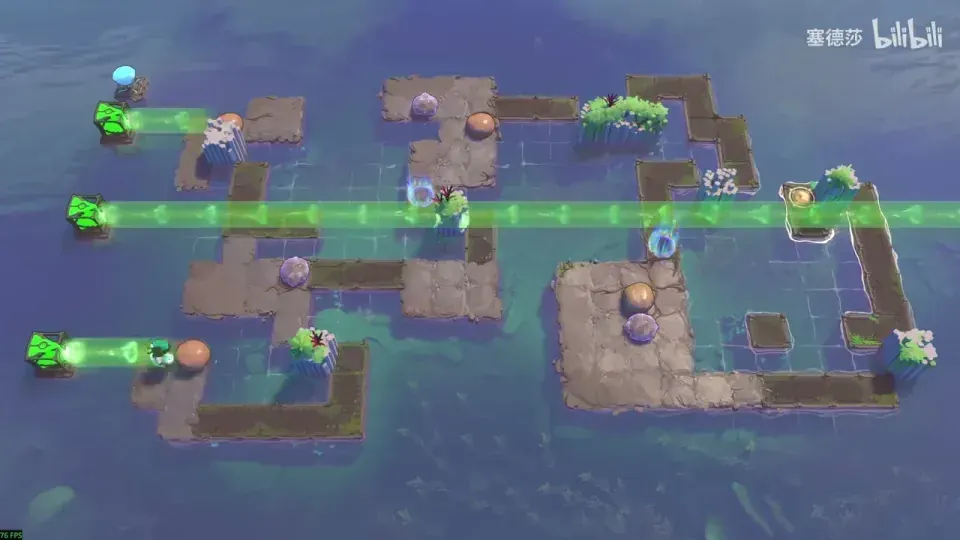
Plain stones stop the light; crystal stones carry it into walls. Gameplay frame from 塞德莎’s recorded walkthrough.
- Move the first stone into the initial gap.
- Avoid sending the crystal straight right while the green beam reaches it: it phases into the wall. Instead move it right, back left, then up into the gap. Bring the plain stone down to fill the tile below.
- At the next pair of holes, move the crystal into the row where the beam parks it inside the wall. Push the plain stone right; it carries the crystal across to the required tile.
- For the final pair of gaps, block the light with the plain stone before sending the crystal across into the first hole.
- Finish by pushing the plain stone upward into the upper-right hole. That hole needs the plain stone because the beam cannot be blocked there.
Keep the last plain stone available until the crystal crossing is complete. Spending it in the first available gap changes the remaining setup: the green-lit crystal does not behave like a light-blocking stone. The recorded solution begins at 5:10 and shows the final two-gap arrangement at 6:30.
Use the purple beam to become the stone’s stopper
Look for an oval walkway around water, with a right-facing purple emitter along its bottom edge and a gem nearby. A stone needs to stop over water; the character supplies the obstacle on the other side.
- Move the gem out of the way and position the purple emitter along the lower edge, pointing right.
- Push the stone right and power the beam.
- Kick the stone left. Immediately take the purple beam to the opposite side so your character blocks the incoming stone.
The teleport is part of the stopping move, not a shortcut to take afterward. If you arrive after the stone has passed the stopping point, it cannot create the required step there. Use the 28:31–28:42 setup and execution to match the emitter position before attempting the timed kick.
For other purple rooms, inspect the endpoint before entering the light. Gems, ordinary stones and lily pads can stop it; crystal stones transmit it. A current can also carry you into the beam, so an unexpected teleport may come from the current moving you rather than from a new interaction rule.
Block both orange beams at the same moment
Identify the hedged layout with two perpendicular orange beams, loose stones on the upper-right island and the exit above the right side. The Explorer starts restricted by the orange light. This route uses ordinary stones to interrupt that light.
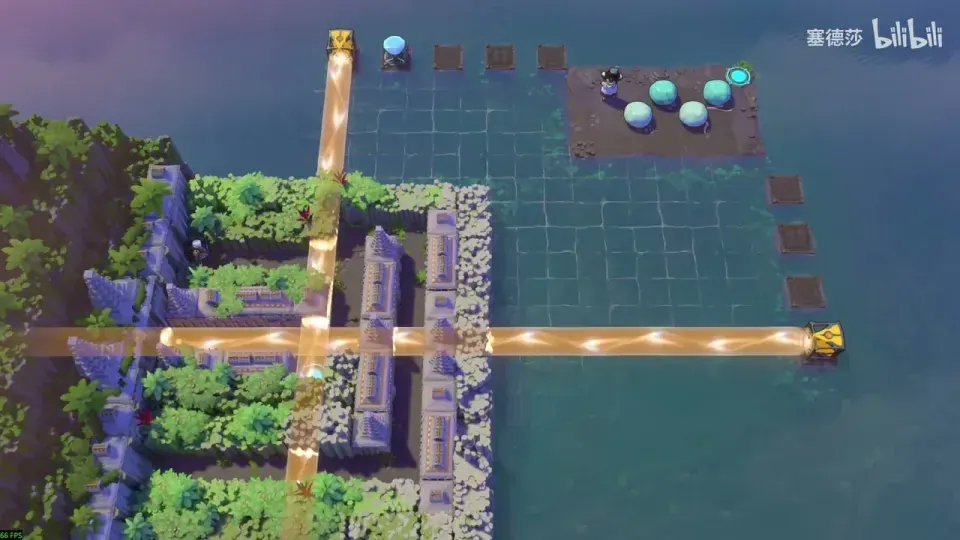
The upper-left and downward stone routes have different travel distances. Gameplay frame from 塞德莎’s recorded walkthrough.
- Kick a light-blocking stone into the first beam. It moves slowly enough to give you time to pass while the light is interrupted.
- At the next blocked position, step one tile left and interrupt the next beam with another plain stone.
- For the crossing that needs both beams dark together, use the unequal travel distances: the upper stone travels nine water tiles left, while the other travels eight down.
- Kick the upper stone left first, then immediately kick the other downward. That one-move delay brings both blockers to their beams together.
- Use the simultaneous interruption to advance through the crossing.
These distances belong to this layout. If your arrangement differs, identify the room again rather than applying the timing to a different board. The recorded timing starts at 30:26. An alternate solution by McNikola also exists; the two-stone sequence is one supported approach, not the only possible solution. The nearby cage remains unavailable at this stage, so its closed state does not mean the beam crossing failed.
Let a robot support the final step over water
A later first-visit layout has a U-shaped walkway, a cage in the middle and a robot near the upper stone. Here the robot keeps patrolling after entering the water.
- Push the robot into the water from below.
- Put one stone on it to act as the moving stopper.
- Time another kick so the second stone stops and sinks in front of the exit.
- Step onto the robot and continue to the exit.
The robot is doing two jobs: supporting the stopper and giving you a traversable moving position. Do not assume it has been lost when it enters the water. The recorded room begins at 12:17 in the next part; the kick setup is shown at 12:44.
Follow the next relevant route
- Use Torc for the West’s facing-sensitive emitter puzzles.
- Read Reflected Beams when mirrors, rather than skipping stones, redirect the emitters.
- Use Skipping Stones lily pads for the underlying pad-moving mechanic.