Identify the region and starting layout
Use reflections to transfer moving stones between the Sailor and Trader while preserving the exact timing and landing positions. The entry labels below follow the cited walkthrough’s grouping. Use the visible heroes, objects, and route description to match your current screen; these labels are not universal in-game IDs.
Search the covered entries
6 guide entries · Mirrors and Stones: Part 4Five numbered stages and the Stamp Stage. These combined puzzles use the Trader and Sailor; their stage numbers are separate from the early Mirror Isles numbering.Full library: 82 guide entries across 10 regions. Partial coverage of a game with 1,000+ puzzles. Progress below measures this library only.
Updated 2026-10-13
Loading local progress… Import replaces this browser’s saved entries.
Stage 1
Reach the room’s marked exit in this combined Mirrors and Stones stage.
- Mirror transfer
- Skipping stones
- Two heroes
- Timed lily pads
Match this layout: The Trader and Sailor start on separate islands with a mirror, one skipping stone, and several lily pads.
Open one clue at a time. The complete sequence stays inside the solution below.
Hint 1
Treat each stone launch as a separate adjustment, with the Trader returning it.
Hint 2
On the third launch, reflect past the first pad so only the second one moves.
Show full solution
- Move the mirror two tiles right into the stone’s line. Launch the stone, reflect it as soon as it bumps the lily pad, and have the Trader send it back.
The first pad moves while the stone remains reusable.
- Move the mirror two tiles left. Have the Sailor launch the stone west; reflect it after it clears the platform, then reflect it again for the Trader to return.
This prepares the next pad arrangement without losing the stone.
- Put the mirror at the west edge and launch the stone north. Reflect immediately; once it passes the first pad, reflect back so it strikes only the second. Reflect it once more for the Trader to return.
Selective timing changes the second pad rather than undoing the first adjustment.
- Skip the stone into the rock protruding from the water. Move the Trader through the newly shifted final pad route to the exit.
The fixed rock makes the last launch move the remaining pad.
If the sequence stops working
- On the third launch, a late reflection can hit the first pad again.
- Return the stone after each of the first three operations; the last shot needs it.
Sources and scope
These instructions cover the layout described above. A similar-looking board may need a different sequence.
Stage 2
Reach the room’s marked exit in this combined Mirrors and Stones stage.
- Mirror transfer
- Skipping stones
- Timed interception
Match this layout: A northern land strip, a second island, a skipping stone, a mirror, and a lily pad mark this room.
Open one clue at a time. The complete sequence stays inside the solution below.
Hint 1
Moving the pad too early blocks the useful route.
Hint 2
Reflect the flying stone just after it clears the northern strip, before it hits the pad.
Show full solution
- Place the mirror three tiles below the stone. Reflect the stone into workable space and bring it two tiles south.
This changes the stone’s launch line.
- Lower the mirror into line with the stone. Send the stone across and reflect it once it clears the northern strip; reflect again onto dry land.
The transfer bypasses the lily pad rather than moving it prematurely.
- On the second island, move the stone south and west. Launch it from the opposite side of the pad to send the pad north.
The pad now creates the finishing route.
- Reflect the Sailor onto the northern strip and follow the route to the exit.
The northern landing is now connected.
If the sequence stops working
- The flying stone must not strike the pad during its first transfer.
Sources and scope
These instructions cover the layout described above. A similar-looking board may need a different sequence.
Stage 3
Reach the room’s marked exit in this combined Mirrors and Stones stage.
- Mirror transfer
- Rock platforms
- Two heroes
Match this layout: A dock, a small water gap, three stones, and a separate route for the Trader.
Open one clue at a time. The complete sequence stays inside the solution below.
Hint 1
Use reflections to put stones into bridge gaps.
Hint 2
After the first platform, reflect the character before lowering the mirror into line with the third stone.
Show full solution
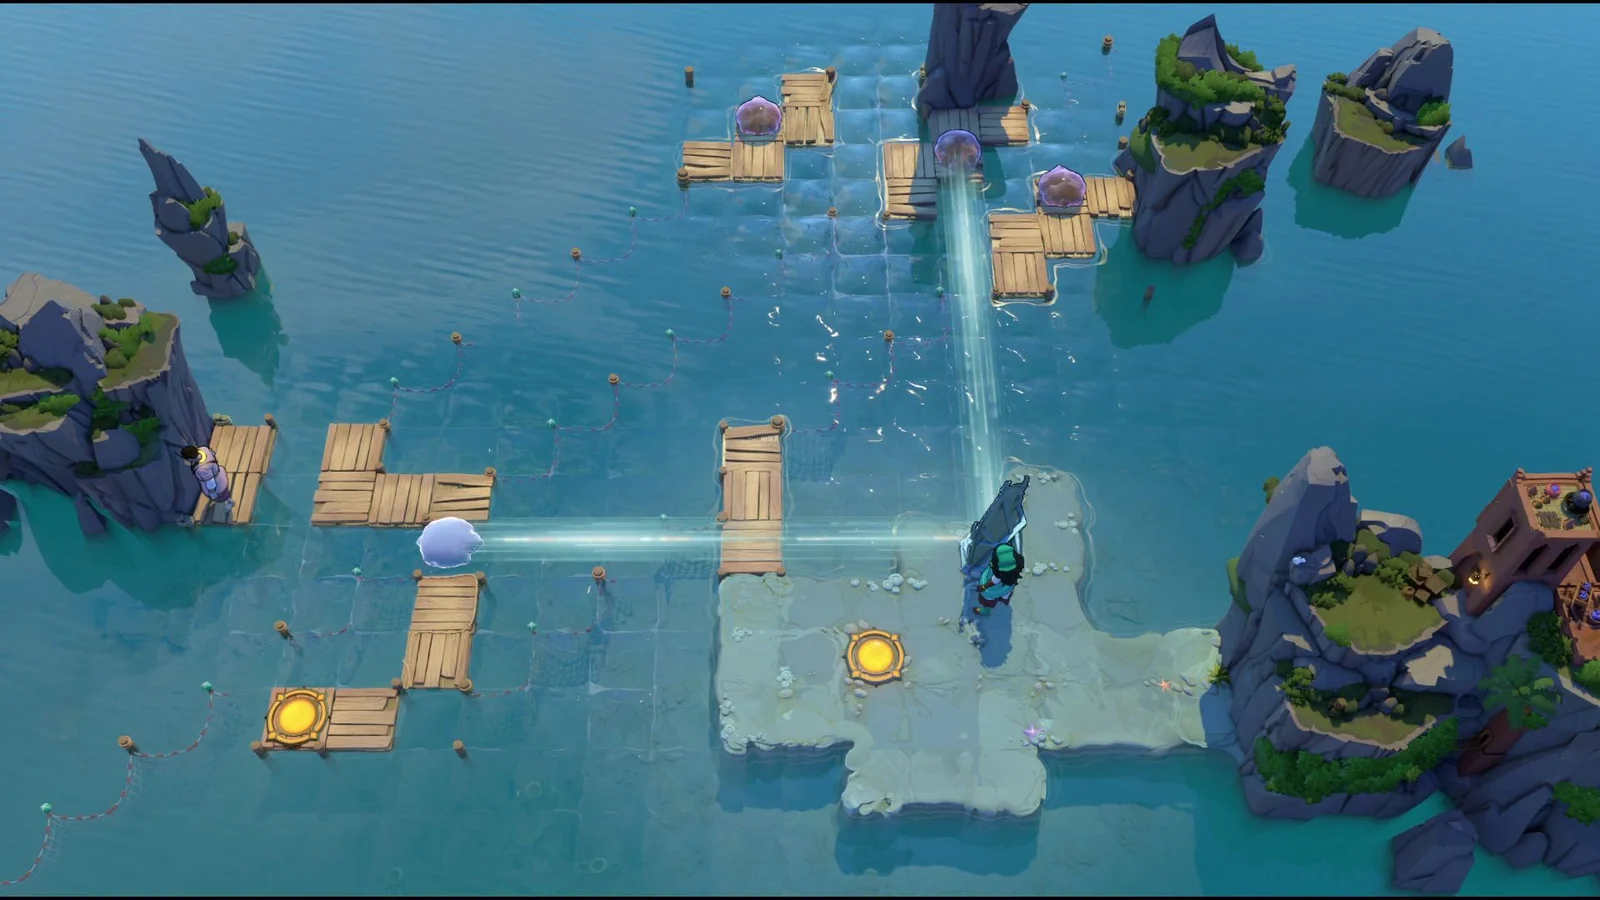
- Move the mirror north and west, then reflect the skipping stone into the small water gap.
This supplies the first bridge tile.
- Move the mirror east and reflect the controlled character. Move the mirror south until it lines up with the third stone.
The character transfer gives access to the next mirror adjustment.
- Reflect the third stone into the next bridge position.
The second bridge opens the remaining route.
- Take the mirror to the end of the dock and reflect the stone that completes the Trader’s path. Walk the Trader to the exit.
The last stone connects the final crossing.
If the sequence stops working
- Reflecting stones without preserving the character’s access can strand the mirror.
Sources and scope
These instructions cover the layout described above. A similar-looking board may need a different sequence.
Stage 4
Reach the room’s marked exit in this combined Mirrors and Stones stage.
- Mirror transfer
- Skipping stones
- Two heroes
Match this layout: Three rocks, a northern platform, a dock, and the Trader’s separate exit island.
Open one clue at a time. The complete sequence stays inside the solution below.
Hint 1
One stone must remain as a northern stepping platform.
Hint 2
The Trader uses the far dock end first, then the rock platform for the last reflection.
Show full solution
- Launch the third rock north onto the platform and reflect it into the first bridge.
This opens the first part of the route.
- Launch the first rock west beside the exit, then reflect it north next to the dock.
This creates the small platform the Trader will use later.
- Launch the second stone onto the first northern platform and form the second bridge for the Trader.
The Trader can now reach the far dock.
- Walk the Trader to the dock’s furthest end and reflect him north. Step onto the rock platform, adjust the mirror, and reflect him onto the exit platform.
The intermediate platform supplies the final landing geometry.
If the sequence stops working
- Using the first rock only as a bridge removes the stepping position beside the dock.
Sources and scope
These instructions cover the layout described above. A similar-looking board may need a different sequence.
Stage 5
Reach the room’s marked exit in this combined Mirrors and Stones stage.
- Mirror transfer
- Skipping stones
- Two heroes
Match this layout: The Trader begins apart from the Sailor; northwest and northeast islands connect through a third dock.
Open one clue at a time. The complete sequence stays inside the solution below.
Hint 1
Moving the Sailor can free the mirror for the Trader’s next transfer.
Hint 2
Leave the Trader on the second island until the last stone creates a platform beside him.
Show full solution
- Move the Trader left and reflect him onto the northwest island. Launch the first stone north toward him, then adjust the mirror so the rock settles into a bridge position.
This connects the Trader to his next launch tile.
- Move the Trader to the stone’s former position and reflect him. Reflect the Sailor left so the mirror can be pushed outward.
The Sailor’s transfer supplies room for the mirror adjustment.
- Take the Trader to the dock’s end and reflect him northeast. Move him to that island’s southeast corner and reflect him onto the third dock.
These positions connect the separated islands.
- At the midpoint of the third dock, reflect the Trader onto the second island and leave him there.
He must wait where the finishing platform will be supplied.
- Launch the stone toward the Trader to create a platform he can step onto. Move him onto it and reflect to the exit.
The new standing tile supplies the final transfer.
If the sequence stops working
- Moving the Trader away from the second island before the last stone launch loses the intended finishing position.
Sources and scope
These instructions cover the layout described above. A similar-looking board may need a different sequence.
Stamp Stage
Reach the room’s marked exit in this combined Mirrors and Stones stage.
- Mirror transfer
- Skipping stones
- Two heroes
Match this layout: The Trader and Sailor share a combined room containing a mirror, several stones, western land strips, and a distant exit.
Open one clue at a time. The complete sequence stays inside the solution below.
Hint 1
The third crossing changes the job of the stone.
Hint 2
Keep the last stone on western dry land before reflecting it once more into the ocean.
Show full solution
- Take the Trader to the easternmost tile and align the mirror with him. Launch the top stone north and reflect after it clears the island.
The reflected stone makes the first bridge.
- Move the Trader as far south as possible. Repeat the launch-and-reflect operation in that line.
This makes the second bridge.
- Put the mirror south, in line with the western island’s southernmost strip. Align the last stone and launch it north, letting it stop at the furthest western dry-land tile.
This stone must first reach land rather than become another bridge.
- Reflect that stone again into the middle of the ocean. Reflect the Trader onto the new platform.
The isolated platform extends the final transfer.
- Move the mirror three tiles north and reflect the Trader onto the final land and exit.
The raised mirror connects the platform to the goal.
If the sequence stops working
- Repeating the bridge pattern for the last stone gives the wrong finishing geometry.
Sources and scope
These instructions cover the layout described above. A similar-looking board may need a different sequence.
Read one clue before opening the full route
Each covered entry has a starting-layout description and a separate hint ladder. Open the first clue and test that idea in the game. The full solution stays collapsed until you choose to reveal it, and important actions include their purpose. If your arrangement no longer matches, undo the changed move before applying another step.
The hint finder can search across regions when you remember an object or mechanic but not the room name. Return to the walkthrough directory for another world or combined area.
Record your own progress
Choose Stuck to set this entry aside or Solved after completing it in the game. Bookmark a useful room independently of its status. The same notes appear in your completion tracker, where you can export a backup before changing browsers. The displayed total refers to covered guide entries rather than every puzzle in this region or the entire game.
Sources and scope
Every entry links to its reference beneath its hints. Directions were reviewed against those published routes; the author does not claim an in-game test. Screen boundaries, timing, and prior object transfers can affect a route, so read the identification and failure notes before following a sequence.